Broken Lens Provides Deep Dive Into Camera Repair

While most of us are probably willing to pick up the tools and void the warranty on just about anything, often just to see what’s inside, many of us draw the line at camera gear. The tiny screws, the complex mechanisms, and the easily destroyed optical elements are all enough to scare off the average hacker. Not so for [Anthony Kouttron], who tore into a broken eBay Sigma lens and got it working again.

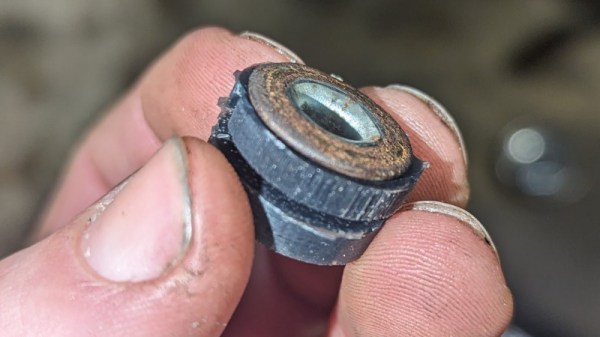
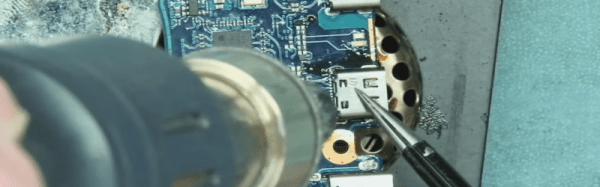
Now, to be fair, modern lenses tend to have a lot more in them that’s amenable to repair than back in the old days. And it seemed from the get-go that [Anthony]’s repair was going to be more electronic than optical or mechanical. The 45-mm lens was in fantastic shape physically, but wouldn’t respond to any controls when mounted to a camera body. Removing the lens bayonet mount exposed the main controller PCB, which is tightly packed with SMD components and connectors for the flex cables that burrow further into the lens to its many sensors and actuators. By probing traces with his multimeter, [Anthony] found a DC-DC converter on the main PCB with an unknown component nearby. This turned out to be an SMD fuse, and as luck would have it, it was open. Replacing the fuse got the lens working again, and while there’s always the nagging suspicion that whatever blew the fuse the first time could happen again, the repair seems to have worked.

Despite the simplicity of the fix, [Anthony] continued the teardown and shared a lot of tips and tricks for lens repairs, including where he would have looked next if the fuse had been good. One tip we loved was the use of double-sided tape to organize parts as they’re removed; this is particularly important with camera gear where screws or different lengths can make for a really bad day on reassembly.

Feeling the need to dive deeper into lens repair? This step-by-step repair should keep you satisfied.

The Impossible Repair: Ribbon Cables

It’s a problem that faces many a piece of older equipment that ribbon cables of the type used on membrane keyboards start to fail as they become older. These cables are extremely difficult to repair as they can’t be soldered to, and since they are usually custom to the device in question. All is not lost, though, as [Spare Time Repair] shows us with the cable on a Honeywell heating controller broken by a user attempting to remove the battery with a screwdriver.

The whole process can be seen in the video below the break, and it involves the use of a vinyl cutter to cut the pattern of tracks in aluminium tape stuck on a sheet of acetate. This makes a new piece of ribbon cable, however it’s still a step short of being part of the circuit. His challenge is to make a clip tight enough to attach it to the intact part of the broken cable and maintain contact, then to hope that the new piece of cable bent back on itself can make enough contact for the device to work.

At the end of it all, he has a working Honeywell controller, though as he points out, it’s a device he has little interest in. Instead, this opens a window on an extremely useful technique that should be of relevance far beyond the world of heating. There’s one machine close to home for us that could use this technique, for example.

Continue reading “The Impossible Repair: Ribbon Cables”

Screenshot of the YouTube channel videos list, showing a number of videos like the ones described in this article.

[DiyOtaku] Gives Old Devices A New Life

Sometimes we get sent a tip that isn’t just a single article or video, but an entire blog or YouTube channel. Today’s channel, [Diy Otaku], is absolutely worth a watch if you want someone see giving a second life to legendary handheld devices, and our creator has been going at it for a while. A common theme in most of the videos so far – taking an old phone or a weathered gaming console, and improving upon them in a meaningful way, whether it’s lovingly restoring them, turning them into a gaming console for your off days, upgrading the battery, or repairing a common fault.

The hacks here are as detailed as they are respectful to the technology they work on. The recent video about putting a laptop touchpad into a game controller, for instance, has the creator caringly replace the controller’s epoxy blob heart with a Pro Micro while preserving the original board for all its graphite-covered pads. The touchpad is the same used in an earlier video to restore a GPD Micro PC with a broken touchpad, a device that you can see our hacker use in a later video running FreeCAD, helping them design a 18650 battery shell for a PSP about to receive a 6000 mAh battery upgrade.

Continue reading “[DiyOtaku] Gives Old Devices A New Life”

How To Cast Silicone Bike Bits

It’s a sad fact of owning older machinery, that no matter how much care is lavished upon your pride and joy, the inexorable march of time takes its toll upon some of the parts. [Jason Scatena] knows this only too well, he’s got a 1976 Honda CJ360 twin, and the rubber bushes that secure its side panels are perished. New ones are hard to come by at a sensible price, so he set about casting his own in silicone.

Naturally this story is of particular interest to owners of old motorcycles, but the techniques should be worth a read to anyone, as we see how he refined his 3D printed mold design and then how he used mica powder to give the clear silicone its black colour. The final buses certainly look the part especially when fitted to the bike frame, and we hope they’ll keep those Honda side panels in place for decades to come. Where this is being written there’s a CB400F in storage, for which we’ll have to remember this project when it’s time to reactivate it.

If fettling old bikes is your thing then we hope you’re in good company here, however we’re unsure that many of you will have restored the parts bin for an entire marque.

Keeping Alive The Future Of Cars, 1980s Style

Here at Hackaday we’re a varied bunch of writers, some of whom have careers away from this organ, and others whose work also appears on the pages of other publications in different fields. One such is our colleague [Lewin Day], and he’s written a cracking piece for The Autopian about the effort to keep an obscure piece of American automotive electronic history alive. We think of big-screen control panels in cars as a new phenomenon, but General Motors was fitting tiny Sony Trinitron CRTs to some models back in the late 1980s. If you own one of these cars the chances are the CRT is inoperable if you’ve not encountered [Jon Morlan] and his work repairing and restoring them.

Lewin’s piece goes into enough technical detail that we won’t simply rehash it here, but it’s interesting to contrast the approach of painstaking repair with that of replacement or emulation. It would be a relatively straightforward project to replace the CRT with a modern LCD displaying the same video, and even to use a modern single board computer to emulate much of a dead system. But we understand completely that to many motor enthusiasts that’s not the point, indeed it’s the very fact it has a frickin’ CRT in the dash that makes the car.We’ll probably never drive a 1989 Oldsmobile Toronado. But we sure want to if it’s got that particular version of the future fitted.

Lewin’s automotive writing is worth watching out for. He once brought us to a motorcycle chariot.

The ROM programmer on display, with an OLED screen attached

Relatively Universal ROM Programmer Makes Retro Tech Hacking Accessible

There’s treasures hidden in old technology, and you deserve to be able to revive it. Whether it’s old personal computer platforms, vending machines, robot arms, or educational kits based on retro platforms, you will need to work with parallel EEPROM chips at some point. [Anders Nielsen] was about to do just that, when he found out that a TL866, a commonly used programmer kit for such ROMs, would cost entire $70 – significantly raising the budget of any parallel ROM-involving hacking. After months of work, he is happy to bring us a project – the Relatively Universal ROM Programmer, an open-source parallel ROM programmer board that you can easily assemble or buy.

Designed in the Arduino shield format, there’s a lot of care and love put into making this board as universal as reasonably possible, so that it fits any of the old flash chips you might want to flash – whether it’s an old UV-erasable ROM that wants a voltage up to 30 V to be written, or the newer 5 V-friendly chips. You can use ICs with pin count from 24 to 32 pins, it’s straightforward to use a ZIF socket with this board, there’s LED indication and silkscreen markings so that you can see and tweak the programming process, and it’s masterfully optimized for automated assembly.

You can breadboard this programmer platform as we’ve previously covered, you can assemble our own boards using the open-source files, and if you don’t want to do either, you can buy the assembled boards from [Anders Nielsen] too! The software is currently work in progress, since that’s part of the secret sauce that makes the $70 programmers tick. You do need to adjust the programming voltage manually, but that can be later improved with a small hardware fix. In total, if you just want to program a few ROM chips, this board saves you a fair bit of money.

Continue reading “Relatively Universal ROM Programmer Makes Retro Tech Hacking Accessible”

Soldering The Elusive USB C Port

Many SMD components, including some USB C ports, have their terminals under the component. When installed, the pins are totally hidden. So, how do you solder or unsolder them? That’s the problem [Learn Electronics Repair] encountered when fixing a Lenovo Yoga, and he shows us his solution in the video below.

He showed the removal in a previous video, but removal is a bit easier since you can just heat up the area, yank the connector, and then clean up the resulting mess at your leisure. Installation is harder because once the socket is down, you no longer have access to the pads.

Continue reading “Soldering The Elusive USB C Port”