Printable Keycaps Keep The AlphaSmart NEO Kicking

Today schools hand out Chromebooks like they’re candy, but in the early 1990s, the idea of giving each student a laptop was laughable unless your zip code happened to be 90210. That said, there was an obvious advantage to giving students electronic devices to write with, especially if the resulting text could be easily uploaded to the teacher’s computer for grading. Seeing an opportunity, a couple ex-Apple engineers created the AlphaSmart line of portable word processors.

The devices were popular enough in schools that they remained in production until 2013, and since then, they’ve gained a sort of cult following by writers who value their incredible battery life, quality keyboard, and distraction-free nature. But keeping these old machines running with limited spare parts can be difficult, so earlier this year a challenge had been put out by the community to develop 3D printable replacement keys for the AlphaSmart — a challenge which [Adam Kemp] and his son [Sam] have now answered.

In an article published on KBD.news, [Sam] documents the duo’s efforts to design the Creative Commons licensed keycaps for the popular Neo variant of the AlphaSmart. Those who’ve created printable replacement parts probably already know the gist of the write-up, but for the uninitiated, it boils down to measuring, measuring, and measuring some more.

Things were made more complicated by the fact that the keyboard on the AlphaSmart Neo uses seven distinct types of keys, each of which took their own fine tuning and tweaking to get right. The task ended up being a good candidate for parametric design, where a model can be modified by changing the variables that determine its shape and size. This was better than having to start from scratch for each key type, but the trade-off is that getting a parametric model working properly takes additional upfront effort.

A further complication was that, instead of using something relatively easy to print like the interface on an MX-style keycap, the AlphaSmart Neo keys snap onto scissor switches. This meant producing them with fused deposition modeling (FDM) was out of the question. The only way to produce such an intricate design at home was to use a resin MSLA printer. While the cost of these machines has come down considerably over the last couple of years, they’re still less than ideal for creating functional parts. [Sam] says getting their keycaps to work reliably on your own printer is likely going to involve some experimentation with different resins and curing times.

[Adam] tells us he originally saw the call for printable AlphaSmart keycaps here on Hackaday, and as we’re personally big fans of the Neo around these parts, we’re glad they took the project on. Their efforts may well help keep a few of these unique gadgets out of the landfill, and that’s always a win in our book.

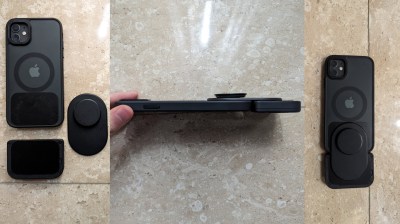
A Google Pixel 7 with a detachable Bluetooth keyboard.

BlueBerry Is A Smartphone-Agnostic Keyboard Firmware

If you’re anything like us, you really, really miss having a physical keyboard on your phone. Well, cry no more, because [Joe LiTrenta] has made it possible for any modern smartphone whatsoever to have a detachable, physical keyboard and mouse at the ready. [Joe] calls this creation the BlueBerry.

A couple of metal plates and a mag-safe pop socket connect a Bluetooth keyboard to a Google Pixel 7. The keyboard/mouse combo in question is a little BlackBerry Bluetooth number from ZitaoTech which is available on Tindie, ready to go in a 3D printed case. What [Joe] has done is to create a custom ZMK-based firmware that allows the keyboard be device-agnostic.

In order to easily mount the keyboard to the phone and make it detachable, [Joe] used adhesive-backed metal mounting plates on both the phone and the keyboard, and a mag-safe pop socket to connect the two. The firmware makes use of layers so everything is easily accessible.

Check out the demo video after the break, which shows the board connected to a Google Pixel 7. It makes the phone comically long, but having a physical keyboard again is serious business, so who’s laughing now? We’d love to see a keyboard that attaches to the broad side of the phone, so someone get on that. Please?

Do you have a PinePhone? There’s an extremely cute keyboard for that.

Continue reading “BlueBerry Is A Smartphone-Agnostic Keyboard Firmware”

A Planck-inspired 40% ortholinear keyboard.

DIY Keyboard Can Handle Up To Three Host Devices

Here’s a story that may be familiar: [der-b] is a Linux developer who is forced two carry two laptops — one for work with unavoidable work stuff on it, and one for software development. Unfortunately this leads to keyboard confusion between the two when one is connected to an external display.

In an attempt to overcome this, [der-b] designed a keyboard that can be connected to more than one device at a time, despite ultimately thinking that this will lead to another layer of confusion. The point was to try to make something as lightweight as possible, since carrying two laptops is already a struggle. As a bonus, this project was a learning experience for soldering SMD parts.

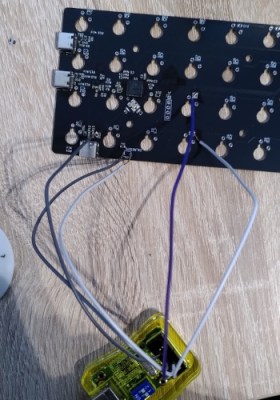
The keyboard itself is based on the Planck and uses an ATMega32u4 running QMK firmware, so that means it’s a 40% ortholinear with 48 keys total. [der-b] used low-profile Cherry MX switches to keep things sleek.

In order to switch between different host devices, [der-b] uses shortcuts as you’ll see in the short video after the break. This is accomplished with a FSUSB36 IC on the USB connections between the ATMega and the host.

[der-b] encountered a spate of issues while building this keyboard, which you can read all about in the blog post. We love to see transparency when it comes to your write-ups, especially when the projects become learning experiences. (Aren’t they all?) But if 48 keys aren’t nearly enough for you, check out this learning-experience keyboard build.

Continue reading “DIY Keyboard Can Handle Up To Three Host Devices”

Displays We Love Hacking: LVDS And EDP

There are times when tiny displays no longer cut it. Whether you want to build a tablet or reuse some laptop displays, you will eventually deal with LVDS and eDP displays. To be more exact, these are displays that want you to use either LVDS or eDP signaling to send a picture.

Of the two, LVDS is the older standard for connecting displays, and eDP is the newer one. In fact, eDP has mostly replaced LVDS for things like laptop and tablet displays. Nevertheless, you will still encounter both of these in the wild, so let’s start with LVDS.

The name “LVDS” actually comes from the LVDS signaling standard (Low-Voltage Differential Signaling), which is a fairly generic data transfer standard over differential pairs, just like RS485. Using LVDS signaling for embedded display purposes is covered by a separate standard called FPD-Link, and when people say “LVDS”, what they’re actually talking about is FPD-Link. In this article, I will also use LVDS while actually talking about FPD-Link. Barely anyone uses FPD-Link except some datasheets, and I’ll use “LVDS” because that’s what people actually use. It’s just that you deserve to know the distinction so that you’re not confused when someone mentions LVDS when talking about, say, industrial machinery.

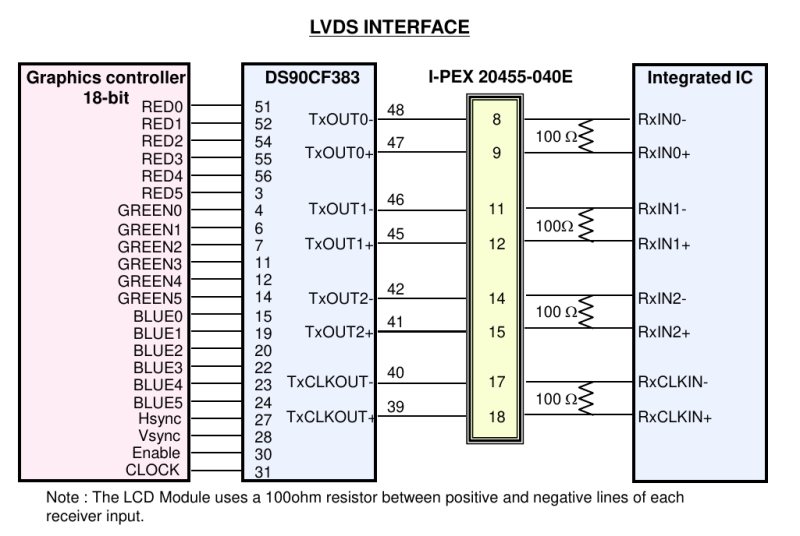
Both LVDS and eDP run at pretty high frequencies – they’re commonly used for color displays with pretty large resolutions, so speed can no longer be a constraint. eDP, as a successor technology, is a fair bit more capable, but LVDS doesn’t pull punches either – if you want to make a 1024 x 768 color LCD panel work, you will use LVDS, sometimes parallel RGB – at this point, SPI just won’t cut it. There’s a lot of overlap – and that’s because LVDS is basically parallel RGB, but serialized and put onto diffpairs. Let me show you how that happened, and why it’s cool.

Continue reading “Displays We Love Hacking: LVDS And EDP”

Bluepad32 Brings All The Controllers To Your MCU

As much as we enjoy spinning up our own solutions, there are times when you’ve got to look at what’s on the market and realize you might be out of your league. For example, take Bluetooth game controllers. Sure, you could make your own with a microcontroller, some buttons, and a couple joysticks. But between the major players like Microsoft, Nintendo, and Sony, as well as independent peripheral companies like 8BitDo, there’s some seriously impressive hardware out there that can be easily repurposed.

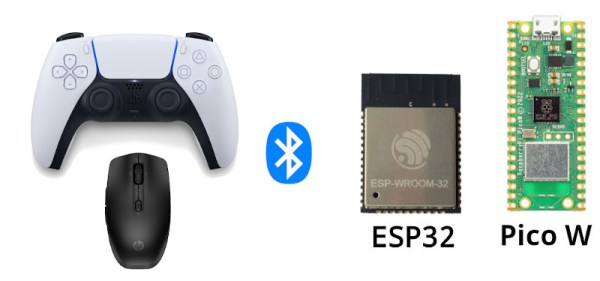
How, you ask? Well, Bluepad32 by [Ricardo Quesada] would be a great place to start. This Apache v2.0 licensed project allows you to easily interface with a wide array of commercially available BT controllers, and supports an impressive number of software and hardware platforms. Using the Arduino IDE on the ESP32? No problem. CircuitPython on Adafruit’s PyPortal? Supported. There’s even example code provided for using it on Linux and Mac OS. Sorry Windows fans — perhaps there’s a sassy paperclip or sentient dog built into your OS that can instruct you further.

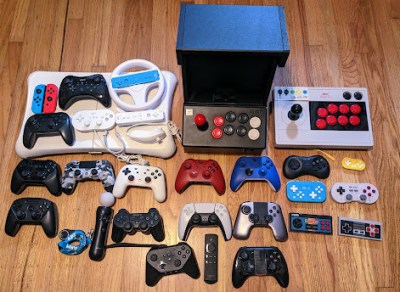
A few of the controllers supported by Bluepad32.

The nature of the Bluetooth Human Interface Device (HID) protocol means that, at least in theory, pretty much all modern devices should be supported by Bluepad32 automatically. But even still, it’s hard not to be impressed by the official controller compatibility list. There’s also separate lists for Bluetooth mice and keyboards that are known to work with the project.

While it’s somewhat unlikely to be a problem in this particular community, there is an unusual quirk to this project which we think should at least be mentioned. Although Bluepad32 itself is free and open source software (FOSS), it depends on the BTstack library, which in turn uses a more ambiguous licensing scheme. BTstack is “open” in the sense that you can see the source code and implement it in your own projects, but its custom license precludes commercial use. If you want to use BTstack (and by extension, Bluepad32) in a commercial product, you need to contact the developers and discuss terms.

License gotchas aside, Bluepad32 is definitely a project to keep in the back of your mind for the future. You can always build your own controller if you’re looking a challenge, but you’ll have a hell of a time beating the decades of testing and development Sony has put into theirs.

Building A Mechanical Keyboard As A Learning Project

[Thomas Rinsma] wanted to learn about designing PCBs. Thus, he set about a nifty project that would both teach him those lessons and net him something useful in the process. The result was kb1, a mechanical keyboard of his own design!

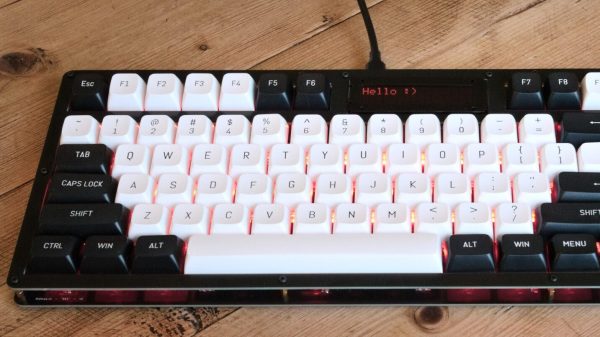
You might think [Thomas] would have started with a basic, barebones design, but he didn’t shy away from including some neat features. His keyboard has a “tenkeyless” layout, and uses Cherry MX-style switches, as has become the norm in the mechanical keyboard world. It has a 16×2 LCD display for user feedback, a rotary encoder, and it even has an RGB backlight for every key thanks to SK6812 addressable LEDs. Running the show is a Raspberry Pi Pico, equipped with the KMK firmware. The board actually uses twin PCBs as the enclosure, which is a nifty trick.

It’s remarkably fully featured for a first time build.

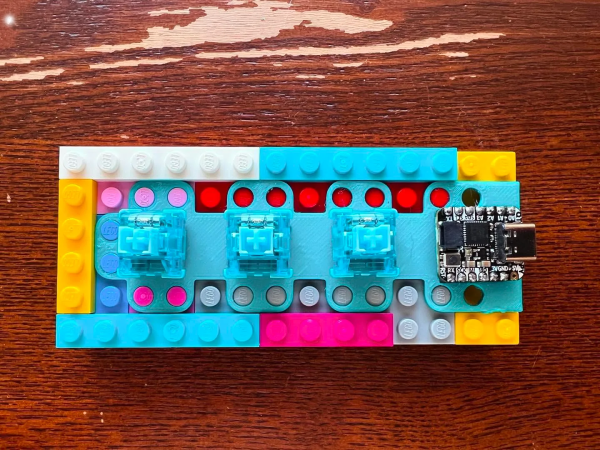
Most of a three-key macro pad featuring a 3D-printed, LEGO-compatible plate.

3D-Printed Macro Pad Plate Is LEGO-Compatible

We love LEGO, we love keyboards, and when the two join forces, we’re usually looking at a versatile peripheral that’s practically indestructible. Such seems to be the case with [joshmarinacci]’s LEGO-compatible 3D-printed plate for a three-key macro pad. For a first foray into scratch-built keyboard construction, we think this is pretty great.

The idea here is threefold: the plate holds the switches in place, negates the need for a PCB, and makes it possible to build the case completely out of LEGO. In fact, [joshmarinacci]’s plan for the keycaps even includes LEGO — they are going to 3D print little adapters that fit the key switch’s stem on one side, and the underside of a 2×2 plate on the other.

Although [joshmarinacci]’s plan is to design a PCB for the next version, there is plenty to be said for combining the plate and the PCB by printing guides for the wires, which we’ve seen before. We’ve also seen LEGO used to create a keyboard stand that fits just right. 

Via KBD