Here’s The Norwegian Tape Deck Teardown You’ve Been Waiting For

“They just don’t build ’em like they used to” is a truer statement every year. Whether your vice is CRTs, film cameras, or tape decks, you’ll know that the very best gear simply isn’t manufactured anymore. Even the day-to-day stuff from 60 years ago is often a cut above a lot of today’s equipment. [Anthony Kouttron] shows us this with his teardown of a Tandberg TCD301 from many decades ago.

The Tandberg unit is beautifully finished in wood and metal, a style of construction that’s fairly rare these days. It’s got big, chunky controls, and a certain level of heft that is out of vogue in modern electronics. Heavy used to mean good — these days, it means old. That’s not to say it’s indestructible, though. It’s full of lots of old plastic pulleys and fasteners that have aged over the decades, so it’s a little fragile inside.

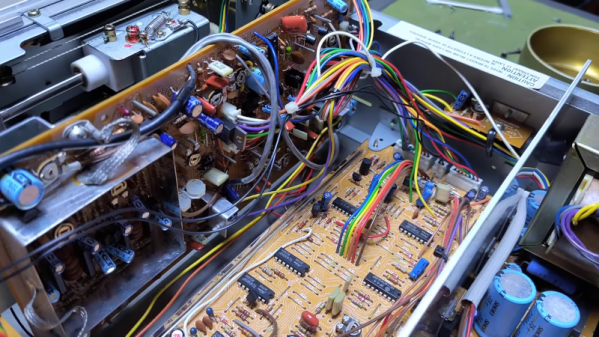
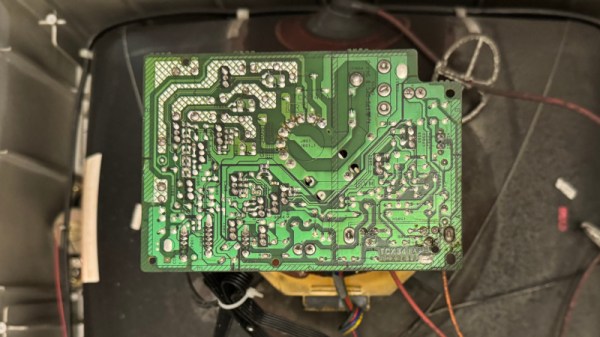
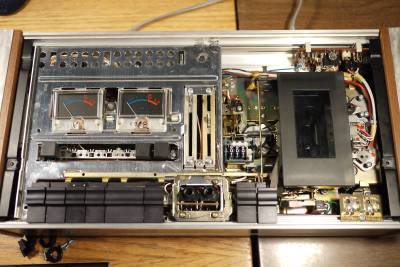
Still, [Anthony] gives us a great look at the aluminium chassis and buttons and the electromechanical parts inside. It’s a rats-nest design with lots of discrete components and wires flying between boards. You couldn’t economically produce this and sell it to anyone today, but this is how it was done so many years ago.

This non-functional unit ended up being little more than a salvage job, but we’re still glad that [Anthony] gave us a look inside. Still, if you long for more cassette-themed teardowns, we’ve got the goodness you’re looking for!

Gather ‘Round This Unique 4-Player Arcade Cabinet

Usually when we see arcade cabinet builds, they’re your standard single-player stand up variety. Even one of them takes up quite a bit of room, so as appealing as it might be to link up two or more cabinets together for the occasional multiplayer session, the space required makes it a non-starter for most of us.

But this cleverly designed 4-player cocktail cabinet from [OgrishGadgeteer] goes a long way towards solving that problem. The circular design of the cabinet gives each player a clear view of their respective display in a much smaller footprint than would otherwise be possible, and the glass top allows the whole thing to double as an actual cocktail table when it’s not game time.

The cabinet was modelled in 3D before construction.

According to a post on r/cade, it took [OgrishGadgeteer] three months to go from paper sketches of the cabinet’s basic shape to the final product. Most of the components were picked up on the second hand market, which brought the total cost of the build to around $350. That wouldn’t have been a surprising price for a traditional full-size cabinet build, so for this, it seems like an absolute steal.

A Dell OptiPlex 7060 small form factor PC provides the power for this build, with the video output passing through a 4-way VGA distribution amplifier into 20 inch monitors. At $75, the four player control kit ended up being the single most expensive component of the build, though you could make do with some parts bin buttons and a Pi Pico if you wanted to really bring this one in on a budget.

Perhaps the most surprising element of the whole build is that, despite the cabinet’s complex design, [OgrishGadgeteer] pulled it off without a CNC to cut the plywood panels. Instead, a vinyl cutter was used to make full-size templates of the cuts and holes that needed to be made, which were attached directly to the wood. After that, it was just a matter of following the lines with a jigsaw. Not the fastest or most convenient solution, but it’s hard to argue with the final results.

We’ve seen other cocktail cabinet builds in the past, but this is the first that managed to cram four players in. Well, unless you count Dungeons & Dragons, anyway.

A diagram from the article, showing the router being used in a car for streaming media to multiple portable devices at once

A Portable DLNA Server Hack Helps You Tame OpenWRT

A good amount of hacks can be done with off-the-shelf hardware – what’s more, it’s usually available all over the world, which means your hacks are easier to build for others, too. Say, you’ve built something around a commonly available portable router, through the magic of open-source software. How do you make the fruits of your labour easy to install for your friends and blog readers? Well, you might want to learn a thing or two from [Albert], who shows us a portable DLNA server built around a GL-MT300N-V2 pocket router.

[Albert]’s blog post is a tutorial on setting it up, with a pre-compiled binary image you can flash onto your router. Flash it, prepare a flash drive with your media files, connect to the WiFi network created by the router, run the VLC player app, and your media library is with you wherever you go.

Now, a binary image is good, but are you wondering how it was made, and how you could achieve similar levels of user-friendliness in your project? Of course, here’s the GitHub repository with OpenWRT configuration files used to build this image, and build instructions are right there in the README. If you ever needed a reference on how to make commonly available OpenWRT devices do your bidding automagically, this is it.

This is an elegant solution to build an portable DLNA server that’s always with you on long rides, and, think of it, it handily beats a typical commercialized alternative, at a lower cost. Want software upgrades? Minor improvements and fixes? Security patches? Everything is under your control, and thanks to the open-source nature of this project, you have a template to follow. There won’t always be a perfectly suited piece of hardware on the market, of course, as this elegant dual-drive Pi-based NAS build will attest.

Your Smart TV Does 4K, Surround Sound, Denial-of-service…

Any reader who has bought a TV in recent years will know that it’s now almost impossible to buy one that’s just a TV. Instead they are all “smart” TVs, with an on-board computer running a custom OS with a pile of streaming apps installed. It fits an age in which linear broadcast TV is looking increasingly archaic, but it brings with it a host of new challenges.

Normally you’d expect us to launch into a story of privacy invasion from a TV manufacturer at this point, but instead we’ve got [Priscilla]’s experience, in which her HiSense Android TV executed a denial of service on the computers on her network.

The root of the problem appears to be the TV running continuous network discovery attempts using random UUIDs, which when happening every few minutes for a year or more, overloads the key caches on other networked machines. The PC which brought the problem to light was a Windows machine, which leaves us sincerely hoping that our Linux boxen might be immune.

It’s fair to place this story more under the heading of bugs than of malicious intent, but even so it’s something that should never have made it to production. The linked story advises nobody to buy a HiSense TV, but to that we’d have to doubt that other manufactures wouldn’t be similarly affected.

Header: William Hook, CC-BY-SA 2.0.

Thanks [Concretedog] for the tip.

Early CD Player Teardown

While CD players are nothing new today, they were the height of high-tech in the early 1980s. [w1ngsfly] shows us the inside of a Phase Linear 9500 player from 1983. Not only does it have many components, but it is also mechanically unusual.

The CD loads into a toaster-like slot and even pops out like a piece of toast. The tracking mechanism is quite complex, and there’s something that looks suspiciously like a dial string from an old slide rule tuner radio. Apparently, the unit was made by Kyocera and is internally similar to a Kyocera DA-01.

There’s a “head position” indicator that is actually just an LED connected to the tracking mechanism. The front panel controls look great but also allow you to control the head position exactly. As [w1ngsfly] mentions, it is almost like moving a turntable’s tonearm where you can drop it anywhere you want.

If we recall, they were about $600 to $1,000 new. If Phase Linear doesn’t ring a bell, they were well known in their day. Founded by [Bob Carver] and [Steve Johnston], the company was bought by Pioneer before the introduction and, later, by Jensen before the introduction of the 9500. [Bob] would go on to found Carver Corporation. You can find plenty of history about the company online.

We’ve seen CD players that look older. These days, CD drives are cheap and they are easy enough to control.

Continue reading “Early CD Player Teardown”

Who’s Afraid Of A CRT?

Older consumer electronic devices follow a desirability curve in which after they fall from favour they can’t be given away. But as they become rarer, they reach a point at which everyone wants them. Then, they can’t be had for love nor money. CRT TVs are now in the first stage, they’re bulky and lower-definition than modern sets, and thus thrift stores and dumpsters still have them in reasonable numbers. To retrogamers and other enthusiasts, this can be a bonanza, and when he saw a high-end late-model JVC on the sidewalk [Chris Person] wasted no time in snapping it up. It worked, but there were a few picture issues, so he set about fixing it.

Continue reading “Who’s Afraid Of A CRT?”

Building A Solar-Powered, Supercapacitor-Based Speaker

Inspired by many months of hours-long load shedding in South Africa, [JGJMatt] decided to make a portable speaker that can play tunes for hours on a single charge and even charge off the integrated solar panel to top the charge off. None of this should sound too surprising, but what differentiates this speaker is the use of two beefy 400 F, 2.7 V supercapacitors in series rather than a lithium-ion battery on the custom PCB with the Ti TPA2013D1 Class-D mono amplifier.

Insides of the speaker prior to stuffing and closing.

The reason for supercapacitors is two-fold. The first is that their lifespan is much longer than that of Li-ion batteries, the second that they can charge much faster. The disadvantages of supercapacitors come in the form of their lower energy density and linear discharge voltage. For the latter issue the TPA2301D1 amplifier has a built-in boost converter for an input range from 1.8 – 5.5 V, and despite the lower energy density a solid 6 hours of playback are claimed.

Beyond the exquisitely finished 3D printed PETG shell and TPU-based passive bass radiator, the functionality consists out of a single full-range speaker and an analog audio input (TRS jack and USB-C). To add Bluetooth support [JGJMatt] created a module consisting out of a Bluetooth module that connects to the USB-C port for both power and analog audio input.

Charging the speaker can be done via the USB-C port, as well as via the solar panel. This means that you can plug its USB-C port into e.g. a laptop’s USB-C port and (hopefully) charge it and play back music at the same time.

For those feeling like replicating this feat, the Gerbers, bill of materials, enclosure STLs, and everything else needed can be be found in the tutorial.

Continue reading “Building A Solar-Powered, Supercapacitor-Based Speaker”